Blog
September 29, 2026
·8 min readHow to Add a 3D Product Configurator to WooCommerce Without Coding

Otuokon Nsikak
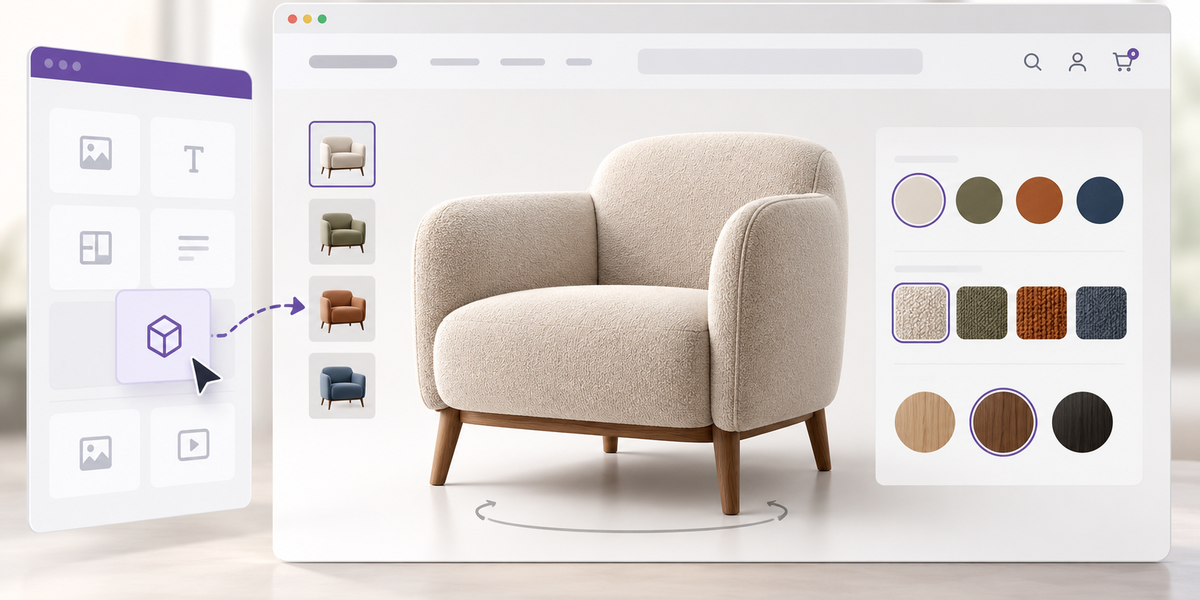
A WooCommerce product page can show photos, a price and an add-to-cart button.
What it often cannot show is the moment that decides the sale:
What does this look like in my colour, my finish, my configuration?
That is the job of a 3D product configurator.
With the right setup, shoppers can change approved options on the page, see the product update in real time, inspect it in 3D and, where relevant, place it in their space with AR. No custom development project is required for a standard launch.
This guide shows how to add that experience to WooCommerce.
What a 3D product configurator actually does
A 3D product configurator lets customers explore product options while viewing a live three-dimensional representation of the item.
Typical options include:
- colour
- material
- finish
- size variants where modelled
- approved accessories or components
Each choice updates the model so the shopper is no longer guessing from a static swatch or a separate photo gallery.
That is different from a basic 3D viewer. A viewer shows the product. A configurator lets the shopper shape the version they are considering.
Why this matters on WooCommerce
WooCommerce stores often lose people at the uncertainty stage.
Shoppers ask:
- Will this finish look right?
- How does the darker option compare?
- What changes when I switch the material?
- Can I trust this configuration before I order?
Photos answer some of that. They rarely answer all of it.
A configurator reduces the gap between interest and confidence, especially for:
- furniture
- customisable home products
- fashion and lifestyle goods with material options
- accessories
- made-to-order or configurable catalogue items
What you need before you start
- A WooCommerce store
- Product options you are willing to offer publicly
- 3D models for the base product and, where needed, variant states
- Clear rules for which combinations are allowed
- A SwiftXR account for building and publishing the experience
If your catalogue is large, do not start with every SKU. Start with the products where configuration actually affects the buying decision.
Step 1: Choose the right first products
A configurator is most useful when option changes are visible and meaningful.
Strong first candidates
- products with colour or material choices
- items where finish affects perceived quality
- products customers already hesitate over in photos
- higher-consideration items with longer decision cycles
Weaker first candidates
- simple one-option products
- items where configuration is only internal
- products with no clean 3D asset path yet
Pick a small set. Prove the workflow. Then expand.
Step 2: Prepare the product options
Write down the options the shopper should control.
Example:
- Frame colour: oak, walnut, black
- Fabric: grey, cream, navy
- Legs: wood, metal
Then define the rules:
- which combinations are allowed
- which options change price
- which options are visual only
- which options should not appear on the page
This prevents the configurator from becoming a messy catalogue of impossible products.
Step 3: Prepare the 3D assets
You need models that can represent the configurable states cleanly.
That may mean:
- one base model with swappable materials
- separate meshes for major components
- carefully named materials for colour and finish changes
Keep the files web-ready. Heavy models slow mobile pages and weaken the experience.
Practical guidance:
- prefer GLB for web publishing when possible
- keep file weight lean for phones
- check scale and orientation before upload
- confirm materials read clearly in browser lighting
If you are still creating assets, modelling software builds the model. SwiftXR is where that model becomes a live product-page experience.
Step 4: Build the configurator in SwiftXR
In SwiftXR:
Create a new project
Upload your product model
Set up the configurable options shoppers should control
Map each option to the correct visual change
Set the default camera angle so the product reads clearly on first load
Adjust lighting and presentation
Enable AR if the product benefits from real-space context
Publish the experience
The goal is simple: every option the customer can choose on the page should produce a clear, immediate visual result.
Step 5: Connect it to WooCommerce
Once the configurator is published, place it on the WooCommerce product page.
With SwiftXR’s WooCommerce path, the usual flow is:
Install the SwiftXR WooCommerce plugin or supported integration
Connect your SwiftXR project to the relevant product
Place the experience on the product page
Confirm that the configurator loads in the product layout
Test add-to-cart and variant behaviour around the experience
The configurator should support the buying decision, not interrupt it. Keep price, options and add-to-cart easy to reach.
Step 6: Match store variants to the 3D experience
This is where many launches get weak.
If WooCommerce offers a “walnut / navy” product variation, the 3D experience should be able to reflect that same combination.
Check:
- option names are consistent
- default state matches the default product selection
- switching options updates the model as expected
- impossible combinations are blocked or hidden
- mobile behaviour still feels smooth
If the page and the model disagree, shoppers lose trust quickly.
Step 7: Test the full product-page journey
Before rollout, test as a real buyer would.
On desktop and mobile, confirm:
- the configurator loads
- options are obvious
- changes appear quickly
- 3D controls are easy
- AR opens where enabled
- the page still feels fast
- add-to-cart still works cleanly
- the chosen configuration remains understandable at checkout
A beautiful model that breaks the purchase path is not a successful install.
What shoppers should be able to do
On a well-built WooCommerce configurator page, a shopper should be able to:
- select an approved colour or material
- see the product update immediately
- rotate and inspect the configured result
- compare visual options with less guesswork
- optionally view the product in AR
- continue to purchase without leaving the page flow
That is the standard. Not “3D exists somewhere on the site.” The experience belongs in the decision moment.
Common mistakes to avoid
Launching too many SKUs at once
Start with the products that need configuration most.
Using oversized models
Slow mobile loads kill interaction.
Offering options the model cannot show
If the visual cannot change, do not present the option as configurable.
Hiding the experience below the fold with no prompt
If shoppers never notice it, it cannot help conversion.
Ignoring variant logic
The store and the configurator must describe the same product.
Treating AR as mandatory for every item
Use AR where scale or spatial context matters.
How to measure whether it is working
Do not stop at “people clicked the 3D view.”
Track:
- interaction rate with the configurator
- time spent on product pages with configuration
- add-to-cart rate on configured products
- conversion rate versus non-configured equivalents
- mobile completion rate
- return rate over time for configured items where data is available
The question is not whether the feature looks modern. The question is whether it helps shoppers decide.
Where SwiftXR fits
SwiftXR is built for teams that want configurable 3D product experiences without running a custom WebXR build for every launch.
For WooCommerce, that means:
- build the configurator in a no-code editor
- publish a live experience
- place it on the product page
- support interactive 3D and AR from the same workflow
- update the experience without redesigning the whole store
SwiftXR does not replace your catalogue logic or your merchandising decisions. It gives shoppers a clearer way to see the product they are configuring.
A practical launch path
Choose 3 to 5 high-uncertainty products
Define allowed options
Prepare clean 3D assets
Build and publish the configurator in SwiftXR
Connect the experience to WooCommerce
Test desktop, mobile and purchase flow
Measure interaction and conversion
Expand only after the first set works
That is how you add a 3D product configurator to WooCommerce without turning the project into a months-long rebuild.
Add 3D and AR to WooCommerce with SwiftXR →
Explore product configurator capabilities →
Frequently Asked Questions
Can WooCommerce support a 3D product configurator?
Yes. With a publishing platform like SwiftXR, you can place an interactive configurator on the product page without building a custom 3D application from scratch.
Do I need a developer to add this?
For a standard setup, no. You still need clean product options and 3D assets, but the configurator can be created and published without a full development team.
Is a configurator the same as a 3D product viewer?
No. A viewer lets people inspect a product. A configurator lets them change approved options and see those changes on the product.
Can customers use this on mobile?
They should be able to. Test on real phones. If the model is too heavy or the controls are unclear, fix that before rollout.
Can this work with product variations already in WooCommerce?
Yes, but only if you align the visible options in the configurator with the store’s actual variation logic.
Should every product get a configurator?
No. Use it where configuration changes the buying decision. A simple one-option product may only need a 3D viewer.
Does this include AR?
It can. AR is useful when shoppers need spatial context. Configuration is useful when they need to choose between visible options. Many products benefit from both.